That’s right. Time to talk about my favorite nerve block.
The SCPB
This block is
quick
and
easy
.
It makes
IJ central lines
painless procedures
.
It also provides excellent analgesia for
clavicle fractures
,
ear lobe lacerations
,
blind subclavian lines
, or
anything within this quadrilateral
:

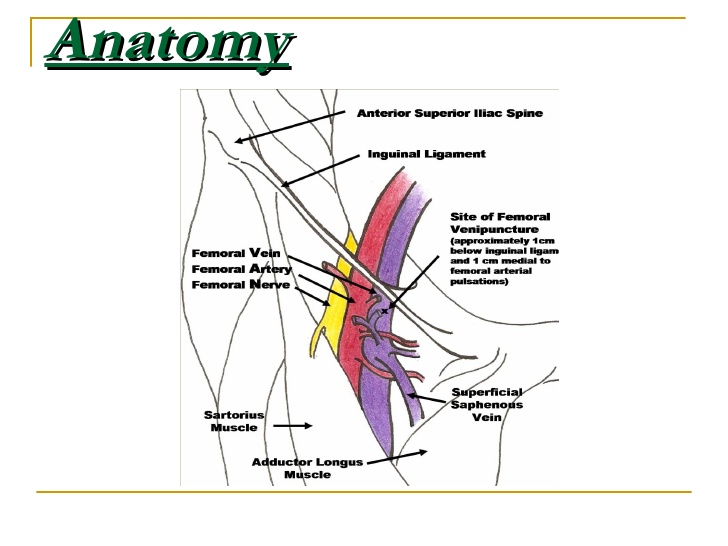
How to do it
Find the
posterior aspect of the sternocleidomastoid (SCM) muscle
.
Position the probe half way down the SCM as you measure it from mastoid process to clavicle.
About at the level of the superior aspect of the thyroid cartilage, also about where the EJ crosses over the sternocleidomastoid.


The fascial plane under the posterior aspect of the sternocleidomastoid muscle is your target.
Like other
plane blocks
you are not targeting any one nerve in particular. By infiltrating this tissue plane, you get the superficial plexus as it peeks out from behind the SCM at this level:

Inject 5-10 cc of local anesthetic.
Ensure it is spreading in the plane like this.


Safety:
As with all ultrasound guided nerve blocks, visualize your needle tip always, especially prior to injection.
When you begin injecting, inject one mL only to ensure you see it spreading in the fascial plane. Then inject the rest.
Withdraw before you inject if there is even a slight possibility you are close to a vessel
Throw some color on your site to ensure you identify any vessels.
In general this is a very well tolerated and forgiving block.
The incidence of phrenic nerve involvement is extremely low with SCPB, far lower than with the interscalene block. Phrenic nerve involvement will be avoided if ensure you don’t go too deep - a few cm, or about half way down the deep edge of the SCM. Going deeper than this results in a deep cervical plexus block which will result in some motor and sensory blockade of the arm.
Horner’s syndrome is a rare and self-limiting complication.
The amount of local anesthetic used in this block is nowhere near close to toxic levels, so local anesthetic systemic toxicity will not occur as long as you manage to avoid the IJ and carotid.
Tips and troubleshooting
For a central line, you can set up, gown, drape, and set up your ultrasound like usual, then use the 5 cc lidocaine which come in the central line kit for your block. Place the block first, then flush your line/lay out your equipment, and your patient will likely be completely numb by the time you’re ready to start your line placement.
The other option is to place your block while you’re doing your pre-scan. This way you can use 5-10 cc, but you have to get it out of the Pyxis. Just clean the probe and the skin with a chlorhexidine swab and use sterile gel.
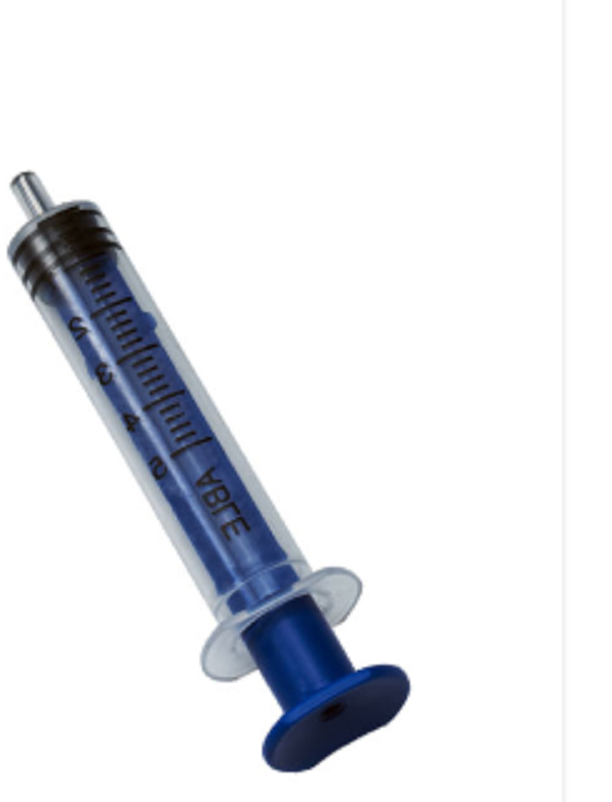
If it’s your first time doing a block, consider doing it as a 2 person block. Use some IV extender tubing and have another provider operate the syringe for you. I like slightly longer tubing than typical IV tubing, e.g. the one below. At Maimo, you can find it in the stock room between North and South sides, top shelf straight ahead when you first walk in.
Can't visualize your needle? Make sure your ultrasound probe is directly above it and in-line with it. Next, make sure it is as close to parallel to the surface of the probe/perpendicular to the ultrasound beams as possible. If you are approaching a 45 degree angle, your needle will be close to invisible. At close to a 0 degree angle, it will shine like a laser beam.
You can use the 27 gauge needles to make it more comfortable but they are a little harder to see.
Further reading and references:
http://highlandultrasound.com/superficial-cervical-plexus-block/
- Highland crushes nerve block education with their website and their SCPB page is no exception
- Mike and Matt of ultrasound podcast also did an amazing episode on this where many of the images in this tutorial are from
https://www.nysora.com/cervical-plexus-block
-
Another good resource