Procedural Sedation and Analgesia - Part 1

Procedural sedation and analgesia (PSA) is the use of analgesic, sedative, and/or dissociative agents with the purpose of relieving pain and anxiety associated with a procedure.

It is well within the scope of the emergency physician and the aim of this post is to go over some key points as well as go over some of the most commonly used agents.

First thing to remember is that sedation is a spectrum and our goal state is determined by our indication for PSA including the duration of the procedure, and the level of pain/anxiety associated with the procedure.

We can then achieve our goal by careful selection of the proper agent, route, and dose.

Also take into account the patient’s age and comorbidities, including hepatic, renal, and cardiopulmonary insufficiencies.

For our purposes, PSA will only be referring to moderate sedation.

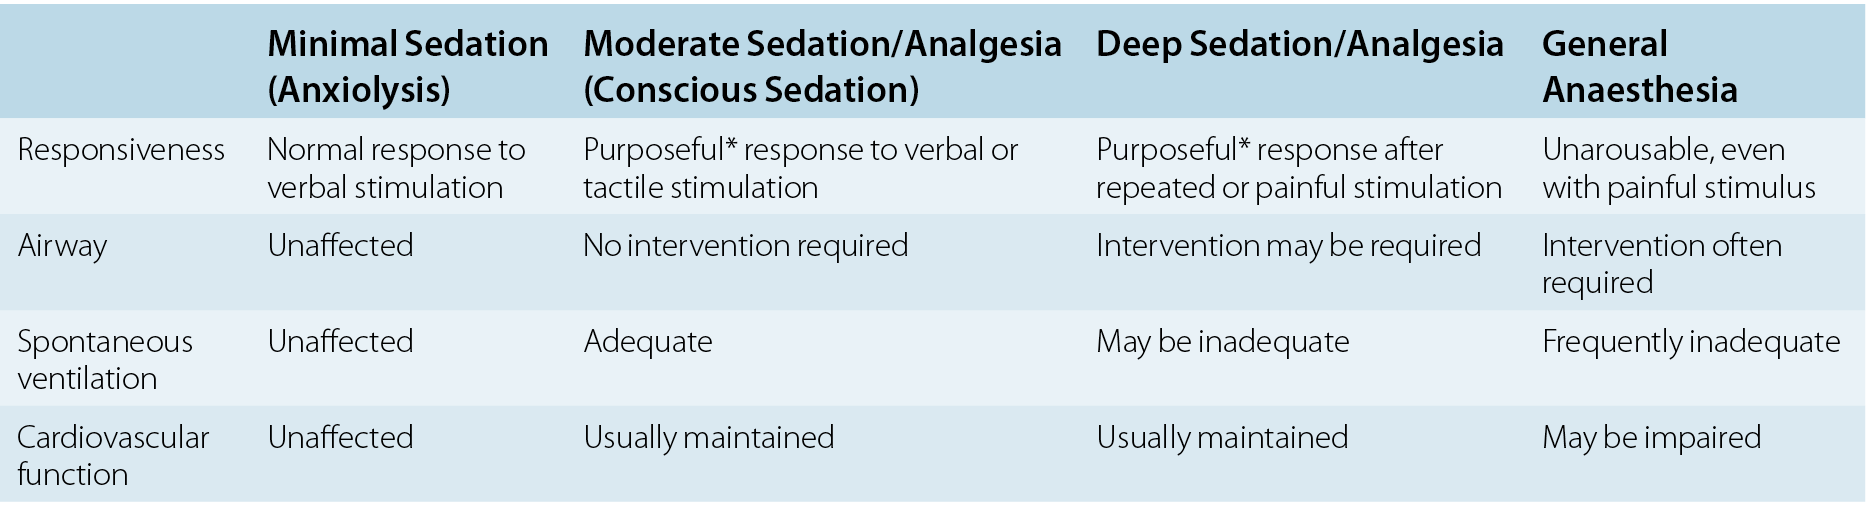
Our goal for PSA is to induce a state that allows a patient to tolerate unpleasant procedures while maintaining cardiorespiratory function by producing a depressed level of consciousness but allowing the patient to maintain airway control independently and consciously.

Before getting into the different agents, here are some definitions to be familiar with:

Analgesia:  Relief of pain without intentional production of an altered mental state such as sedation. An altered mental state may be a secondary effect of medications administered for this purpose.

Anxiolysis: State of decreased apprehension concerning a particular situation in which there is no change in a patient’s level of awareness

Dissociation: Trancelike cataleptic state in which the cortical centers are prevented from receiving sensory stimuli, but cardiopulmonary activity and responses are preserved.

ketamine.gif

Can you guess which PSA agent was used on this pediatric patient?

Find out next time in our PSA POTD - Part 2!

 · 

Joint Aspiration: Ankle

When to tap?

When you have a debilitating ankle injury with swelling at the tibiotalar joint preventing range of motion at that joint ie: dorsiflexion/plantarflexion.

What about the differential?

Ankle arthrocentesis allows for rapid identification of septic arthritis vs. gout vs. pseudogout vs. osteoarthritis vs. rheumatoid arthritis.

What are your landmarks?

The goal is to avoid the Dorsalis pedal artery, the peroneal nerve and the tendon of the Extensor Hallucis Longus (EHL). It is recommended to use an anterolateral approach where the joint line can be found between the lateral edge of the EDL and the medial edge of the lateral malleolus (Yellow Arrow Image 1). Plantarflex the ankle while the patient is bent at the knee in the supine position to widen the joint space prior to performing the procedure.

IMAGE 1:

Foot.jpg


How do you perform it?

  • 1. Patient should be in a supine position with the ankle in plantar flexion with plantar surface flat on the bed.  

  • 2. Mark you landmarks (see above).

  • 3. Prepare the site (ex. chloraprep)

  • 4. Anesthetize the area with smaller needle(23/25 gauge) creating a wheal and then advance creating the start of a projected path towards the joint capsule.

  • 5. Attach a 5 or 10 cc syringe to a 20 or 22 gauge needle and advance the needle into the joint space pulling negative pressure as you advance. The needle should be directed perpendicular to the tibia. If your syringe starts to fill up, and you need to get more fluid out, change out your syringe using hemostats to hold the needle. Most wrist and ankle effusions will yield only 1-3cc of fluid.

What about Ultrasound Guidance?

YES. This can absolutely be used to assist you in performing the procedure and will allow for visualization of your needle tip during aspiration.


For ultrasound guidance an anteromedial approach is generally used.

Landmarks- Place probe in between the TA tendon and EHL tendon, then rotate longitudinally with the probe marker facing the patient’s head  (Blue Arrow IMAGE 1). You will actually be inserting your needle medial to the TA tendon (Red Arrow IMAGE 1).

Image 2: 

more-tips-and-tricks-6.jpg
more-tips-and-tricks-7.jpg

Image 3:

AnkleTap.png

POTD: Trauma Tuesday: Lateral Canthotomy

When to perform it?

·      To release orbital compression syndrome, most commonly due to retrobulbar hematoma.

·      IOP > 40, the pressure that indicated that you need to cut and release the compartment syndrome.

·      Without decompression, irreversible vision loss due to increasing orbital pressure may occur in as little as 90-120 minutes.

Clinical situation: trauma to the head/face.

Physical exam:

https://www.emra.org/emresident/article/emergency-department-evaluation-of-blunt-orbital-trauma/

https://www.emra.org/emresident/article/emergency-department-evaluation-of-blunt-orbital-trauma/

CT head and face

112-208-f2.jpg

familiarize yourself with the anatomy

potd anatomy eye.png

Before starting, highly consider sedation.

Steps:

1)    Generously inject 1% Lidocaine with epi to numb that lateral canthus to the orbital rim.

  • Do this by directing the needle away from the globe itself

  • Helps with bleeding and with pain.

2)    Using the needle driver as your hemostat, advance from the lateral canthus to outer orbit rim. Clamp down and hold for 1- 2 minutes.

3)    Using your small scissors, cut the lateral canthus to the orbital rim.

4)    Then cut inferiorly to cut the inferior crus of the lateral canthus (you may need to probe around to feel the structures)

5)    Repeat IOP. If the IOP is not immediately lower, then cut the superior crus of the lateral canthus and recheck pressure.

Pearls:

·      There is a lot of swelling. It can be hard to fit your hemostat in place and to feel your landmarks. Use you instruments to feel/probe around.

·      Also, do not worry about cutting too much. You are doing this to save this patient’s vision. After discussing this with optho, these are repaired quite easily days/weeks later. For example, Dr. Tome Levy performed this once on a patient that I later followed up with in split flow about 2 weeks later. There was no physical evidence on physical exam that this had ever happened. At first I thought I had the wrong patient in front of me… but the patient confirmed that a week and half ago he had in fact had the optho plastic surgery to repair it.  

Sources:

https://emedicine.medscape.com/article/82812-overview

http://www.tamingthesru.com/blog/annals-of-b-pod/ocular-emergency

This is an excellent emrap video that reviews the procedure: https://www.youtube.com/watch?v=tgQaKVGynFA

 ·