Hi everyone, This Trauma Tuesday, we'll be discussing the ED approach to Burr holes, inspired by a discussion from today's Trauma Sim. This is admittedly a procedure that few if any of us have ever or will ever need to do. But just in case you ever find yourself manning a rural ED with the nearest neurosurgery center hours away, let's refresh our minds.
There was a great article in last month's ACEP Now newsletter (http://www.acepnow.com/article/perform-emergency-burr-hole-procedure/) written by the medical director of a rural 12-bed ED who recently saved a young boy's life by performing a Burr hole:
2 year old child presented after falling out of shopping cart. Initially appeared well and running around the exam room. However, he became somnolent after a period of observation and had slightly unequal pupils on repeat exam. Head CT showed a large epidural hematoma with midline shift. His pupillary exam drastically worsened (6 mm and 2 mm) and he was intubated. The nearest pediatric trauma center was 1 hour away by helicopter. The patient would almost surely herniate en route if no intervention was done. The physician made the decision to perform a Burr hole, evacuated 150 mL of blood, pupils improved, pt was shipped out, and returned to the ED 1 month later for an unrelated visit, running around and completely neuro intact. PRETTY AWESOME, RIGHT?
First let's review the indications for an ED burr hole. They're pretty simple:
- Epidural/subdural hematoma with midline shift on imaging and unequal pupils on exam
- GCS<8
- Anticipated extended time to neurosurgical intervention. Small studies show that ED Burr holes are most effective when performed within 60-90 min of onset of anisocoria. (Door-to-drill time metric?? Think of those patients who arrive walky/talky and decompensate in front of your eyes. Sort of reminiscent of indications for an ED thoracotomy)
Next, let's review the anatomy. This diagram shows 3 potential locations for Burr holes to be done, depending on the location of the bleed on CT. I've seen Neurosurgery in our ED use the parietal site to place an external ventricular drain. The safest location for the ED physician is to go for the temporal site, due to lowest risk of further puncturing the middle meningeal artery. The temporal site is found by going 2 cm anterior and then 2 cm superior to the tragus (pictured).

Now let's review the procedure itself.
STEP 1: Get your equipment - manual trephinator (commercially made kits are available; the Galt trephine shown below is typical), sterile drapes/gown/gloves, chlorhexidine preps, razor (must shave the scalp at the site), scalpel, local anesthetic.

STEP 2: Adjust the stopper on the trephinator to the appropriate depth based on the CT, as shown here:

STEP 3: Once the site is shaved and prepped, inject local anesthetic. Start with a vertical incision with the scalpel down to the periosteum to expose it.
STEP 4: Apply the trephine with gentle, steady pressure until the skull is penetrated. Remove the bone fragment and store in sterile saline. The clot may not immediately extrude; if so then use a pediatric suction catheter to GENTLY facilitate hematoma drainage. Once blood flow slows/stops, apply a loose sterile dressing. Do not tamponade the bleeding.
And of course, final step is to transfer the patient out immediately. Who's ready to do some Burr holes? :)
References: https://wikem.org/wiki/Burr_hole http://resus.me/burr-holes-by-emergency-physicians/


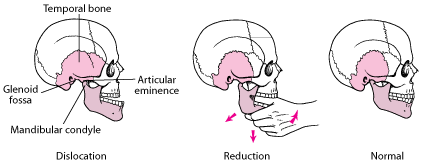
 Now let's talk reduction!
 Downsides:
- Often requires procedural sedation
- Requires a surprisingly large amount of force
- You have to put your hands into the patient's mouth, which is risky
 Use your other hand to provide support and gentle counter-traction (figure 4).
 This video shows it's really as easy as it sounds: https://youtu.be/N3edJvp5DoA