Decisional Capacity POD

DECISIONAL CAPACITY

Decisional capacity is the ability of a patient to make medical decisions on their own behalf. Any physician can determine if a patient has or lacks capacity, not just psychiatrists. We as emergency physicians must be extremely comfortable with assessing decisional capacity, whether it’s for a disposition (e.g. patient wants to go home), for a procedure (e.g. patient doesn't want a lumbar puncture), or for any other medical decision.

There are 4 components of decisional capacity

1. What do I have? - understanding of current condition

2. What are my options? - understanding of possible choices

3. What will I do? - ability to communicate a choice

4. Why? - ability to reason appropriately and understand likely consequences of decisions

Common Scenarios:

Elderly/possibly demented people that want to go home despite a possible dangerous condition

  • They’ve already communicated a choice

  • You need to figure out if they understand their condition, their available choices (maybe home with PMD fu, vs CDU, vs admit), and if they can reason (why do you want to go home? What are the risks and benefits of going home? What are the risks and benefits of admission?)

  • Reach out to family or a healthcare proxy to A.) help determine if the patient is acting at baseline and if their decision is consistent with their core values, and B.) make a decision for them if they lack capacity (responsibility of next of kin or healthcare proxy)

Drunk or otherwise intoxicated people that want to go home despite indication for workup of a possible dangerous disease process

  • Most of the time they don’t have capacity; their ability to reason is often significantly impaired

Psychiatric patients

  • While technically within our purview to assess capacity in all patients, you should err on the side of consulting psychiatry for these patients; they are the experts in differentiating eccentric behavior from an exacerbation of psychiatric illness that truly impairs judgement

Pro tips

  • The decision should ideally be consistent over time! If you ask multiple times and their answer keeps changing, they are not communicating a clear choice

  • Involve the family and/or PMD whenever possible with these decisions

  • If it’s extremely difficult, you feel like you’re not getting anywhere, or you’re out of time, call psych for help

  • Try to let go of any biases toward this patient that may have accrued during their stay (it doesn’t matter that they’ve been a pain in the neck during their ED stay, you should not lower your threshold for saying they have capacity so you can get them out of the ED)

  • Always drop a note; it should address the four elements of decisional capacity

Example Capacity Note

pt wants to be discharged and has capacity to make this decision:

pt understands that she has pneumonia (#1)

understands options including hospital admission, CDU, and home with PMD fu (#2)

pt chooses home with PMD (#3) fu and reasons that she prefers to be at home at her age because it’s more comfortable even if it comes with a higher mortality risk given her condition (#4)

she has expressed this choice multiple times during her ED stay, has an active DNR/DNI order, and her family/PMD supports her decision (consistency during ED stay, consistent with core values, family and PMD on board)

 · 

Hip Dislocations POD

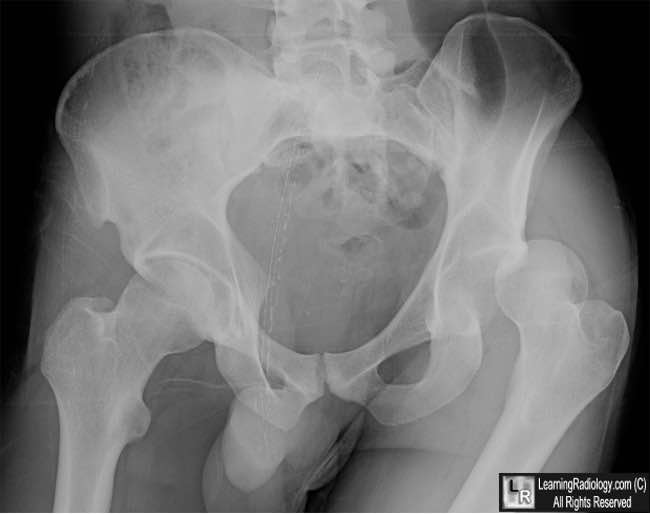
This POD was inspired by a case that Dr. Zerzan had in the Peds ED. An 8 year old with a traumatic injury presented with hip pain and was found to have an isolated posterior hip dislocation…

PastedGraphic-7.tiff
PastedGraphic-6.tiff
PastedGraphic-5.tiff
PastedGraphic-4.tiff
PastedGraphic-3-1.tiff
PastedGraphic-2-1.tiff

Hip dislocations!

Posterior hip dislocations (PHDs) are far more common than anterior hip dislocations

(90% - 10%). This holds true in pediatrics as well in adults.

PastedGraphic-1.jpeg

In a posterior dislocation, the patient presents with the extremity internally rotated and shortened.

PastedGraphic-2.jpeg
PastedGraphic-4.jpeg

In anterior dislocations, patients typically present with extremity flexed, abducted, and externally rotated.

PastedGraphic-3.jpeg
PastedGraphic-5.jpeg

We will focus on

posterior dislocations.

Classic presentation is with an axial load such as a knee hitting the dashboard in an MVC or other high energy mechanisms.

hip-dislocation-POD.jpg

Important point: in adults and children >10yo, PHDs require a high energy mechanism and will often have several associated injuries.

However in children <10yo, PHDs can be seen in lower energy mechanisms such as routine sports injuries which is why you may actually see an isolated hip dislocation in a child. There are also fewer associated acetabular fractures in pediatric PHDs than adult PHDs.

Any child PhD knows…

PastedGraphic-6.jpeg

..that PHDs are true emergencies!

You need to

get it reduced ASAP (within 6 hours)

to prevent complications of femoral head osteonecrosis and sciatic nerve injury. Other complications include post-traumatic arthritis, and in pediatrics, physeal injury. Incidence of recurrent dislocation is higher in pediatrics than in adults!

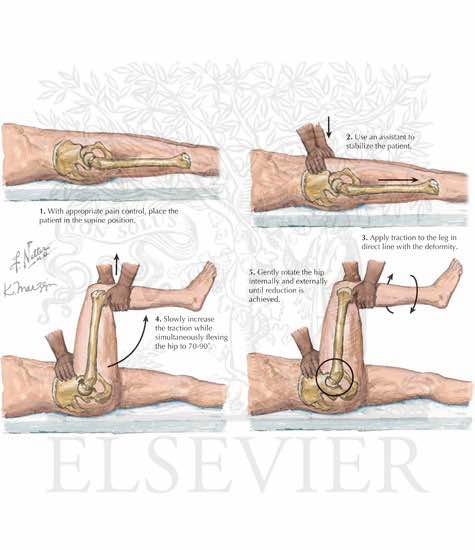
Reduction techniques:

The Allis Maneuver:

PastedGraphic-7.jpeg

The Captain Morgan:

PastedGraphic-8.png

Video here: 

https://www.youtube.com/watch?time_continue=82&v=lQMWaFX-MeQ

Propofol is preferred agent for procedural sedation given its muscle relaxant properties if it is going to be reduced in the ED, but pediatric cases are often reduced in the OR to ensure optimal muscle relaxation and to have more options available.

It is essential to have optimal muscle relaxation in pediatrics as the growth plates can be damaged during reduction.

Open reduction should be considered if fracture-dislocation or unsuccessful closed reduction attempt.

All patients should get at least a CT to evaluate for femoral head fractures, intra-articular loose bodies/incarcerated fragments, acetabular fractures.

Children should get an MRI to evaluate for ligamentous injury as well.

If closed reduction is successful, disposition is protected weight-bearing 4-6 weeks, ortho follow up.

PastedGraphic-1-1.tiff
PastedGraphic-2-1.tiff
PastedGraphic-3-1.tiff
PastedGraphic-4.tiff
PastedGraphic-5.tiff
PastedGraphic-6.tiff
PastedGraphic-7.tiff
 · 

Cordis Placement POD

Today’s Pearl of the Day is onCordis Placement! This topic is geared more toward our interns and second-years who have less experience in big trauma (have not yet rotated at Shock).

The

cordis is the preferred central line in trauma

, unstable GI bleeds, ruptured AAAs, or any other situation in which the necessity for rapid transfusion of blood products is anticipated. It is a short, wide, single-lumen central venous catheter that is perfect for rapid large-volume infusions.

The kit looks like this.

cordis-kit-wide.jpg

(The kit in the picture above also has a sterile sleeve for transvenous pacer placement, but that plays no role in cordis placement for resuscitation).

Here it is with all the components taken out, in order of use.

Cordis-Contents.jpg

Note that when you first open the kit, the dilator sits BACKWARDS in the cordis catheter.

cordis-kit-wide-copy.jpg

So the first step in setting up for this line is to take the dilator out of the front end of the cordis and place it in the back end of the cordis so it looks like this.

cordis-ready-to-go-.jpg

Flush the line (unless you need to draw blood off of it immediately) and lock it so it doesn’t bleed everywhere.

The rest of cordis placement is fairly straightforward.

Cordis placement: wire in, dilator-cordis in, wire and dilator out (while cordis catheter stays in).

Contrast that with

triple lumen catheter placement: wire in, dilator in, dilator out, triple lumen catheter in, wire out (while triple lumen catheter stays in).

For a more detailed explanation of cordis placement, READ ON!

By this point the patient has already been prepped/draped/anesthetized (if time permits).

The next step is to 

get your wire into the vessel

. To achieve this you can either use the wire-through-needle technique or wire-through-catheter technique. For a review of the wire through catheter technique, please see Dr. Strayer’s video on this topic: 

https://vimeo.com/133254469

I will focus on the wire through needle technique in this guide.. Note that this kit has a special

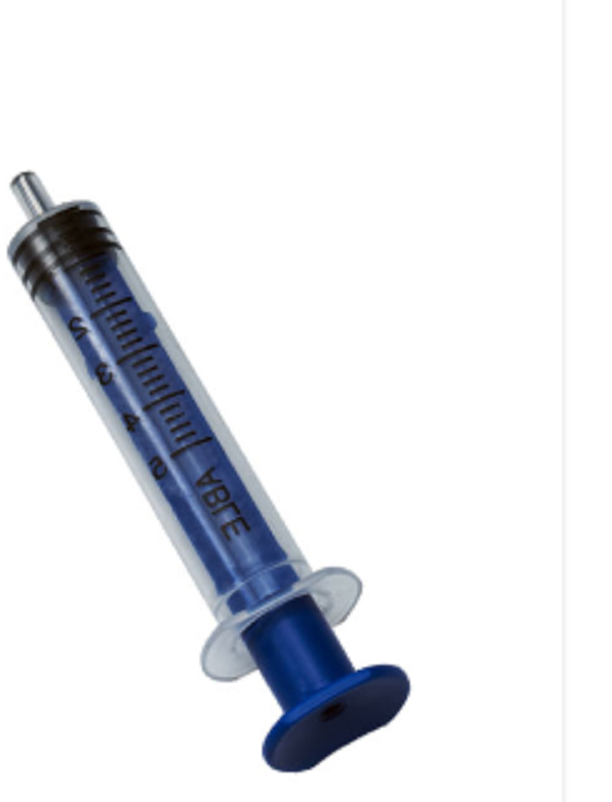
blue syringe: the introducer syringe.

 It has a hole in the back of the plunger that allows you to advance the needle directly through the syringe and out the needle. Using this feature allows you to skip the step of taking the syringe off the needle which can lead to the needle slipping out of the vessel.

Image result for introducer syringe

If using ultrasound, note depth of vessel, position in center of ultrasound screen, visualize vessel, and advance needle tip directly into the center of the vessel (see my PIV POD email/Maimo Blog post 

http://mmcedrco.w02.wh-2.com/EMBlog/2018/08/23/

 for description of this technique).

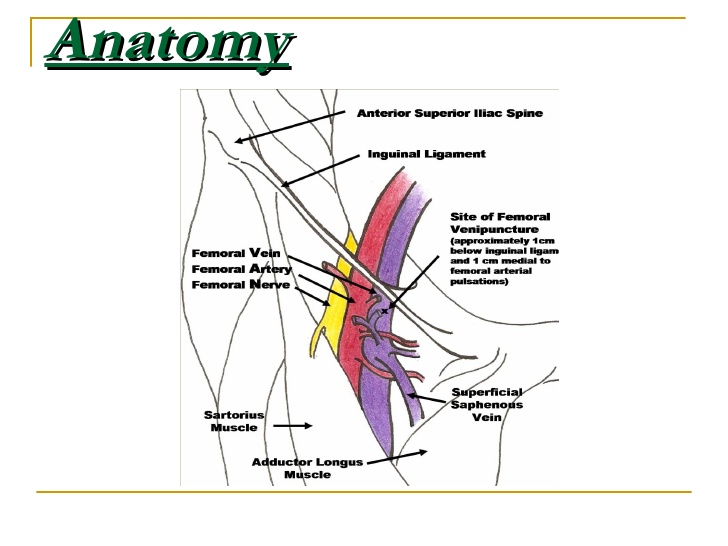
If using landmarks (this guide will focus on the femoral vein site), place a thumb on the pubic symphysis and index finger on ASIS. The line between them is the inguinal ligament. Half-way between them is the femoral artery and 1cm more medial is the femoral vein. 

femoral-line-4-728.jpg

If you can’t remember which side the vein is on, remember “

venous is toward the penis

”. The

puncture site should be 1-2cm distal to the inguinal ligament

.

 If the artery is palpable, enter 1cm medial to it. If it isn’t easily palpable, enter just above the webspace between your thumb and index finger as they are positioned on pubic symphysis and ASIS respectively.

Always aspirate the plunger while you advance.

Once you get flash, keep needle/syringe perfectly still in non-dominant hand braced on patient. Check once more that blood can be aspirated, then reach for wire with your dominant hand;

advance wire through syringe

(assuming you’re using the blue introducer syringe). It should advance smoothly. If it doesn’t, take out the wire, check that blood is still easily aspirated, reposition or drop your angle as needed and try to advance wire again.

Wire is now in place.

Needle/syringe are removed

over the wire. Make a 

skin-nick with the scalpel

in the direction of the wire.

Advance the dilator-cordis-unit over the wire

, stabilizing the wire from behind the dilator-cordis with your non-dominant hand and advancing the dilator-cordis with your dominant hand.

Advance sequentially with small twisting motions

 always

gripping the cordis close to the skin

, until it is “hubbed” (cannot advance any further). 

Wire comes out, then dilator comes out.

(Or wire and dilator can come out together if you can grab them both comfortably). Flush your line, suture in place, cover with sterile dressing kit, and you’re done.

Image credit:

Brown EM Educational Blog Website

(

http://blogs.brown.edu/emergency-medicine-residency/the-central-line-part-2-technique-procedural-steps/)

Slideshare.net

Google image search

 ·