A patient came to the north side today with an acute aortic dissection. Here are images obtained by the ultrasound team when the patient first came in.
A suprasternal view showing an intimal flap:

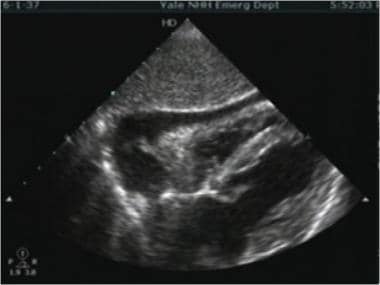
A short axis view of the abdominal aorta showing an intimal flap

Diagnosis was made, BP meds started, cardiothoracic consulted, and CT expedited.
CT showed a severe type B thoracoabdominal aortic dissection:

Aortic Dissection
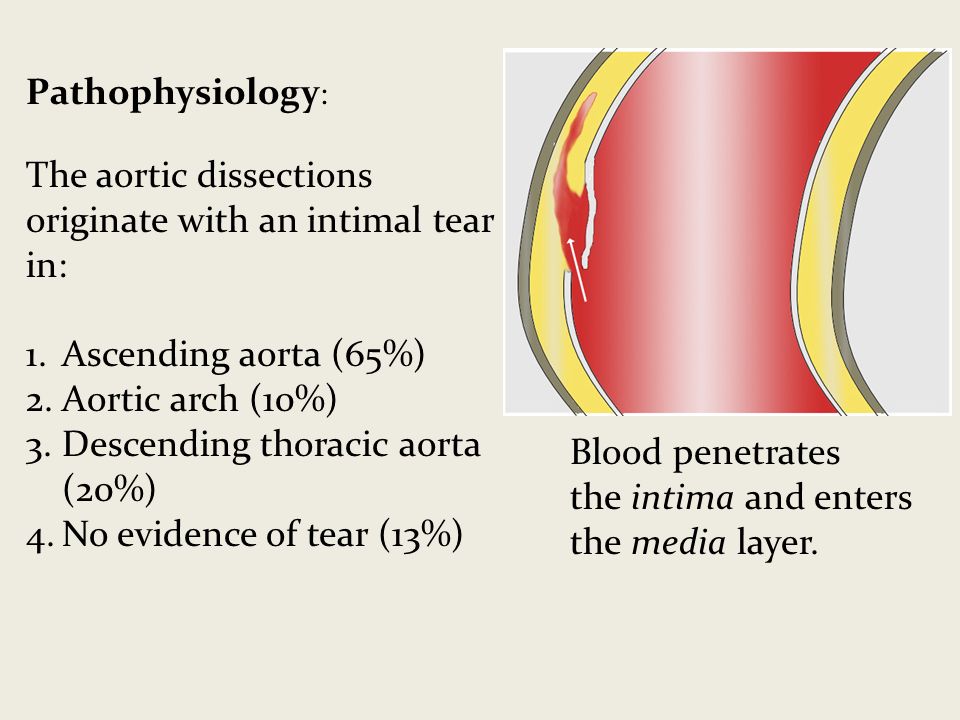
Pathophysiology:
Tear in the intima (inner most layer), bleeding into the media (middle layer)
Diagnosis of aortic dissection is very time sensitive:
mortality is directly proportional to time elapsed between symptom onset and diagnosis/treatment
.
How does it eventually kill you? (I think it’s important to ask this question about all disease processes)
acute aortic regurgitation —> cardiogenic shock
Cardiac tamponade —> obstructive shock
Major brach-vessel obstruction —> vasodilatory shock from dead organ or limb
Aortic rupture —> hemorrhagic shock
2 types that we care about: Stanford Type A and Stanford Type B

Type A
:
involves ascending aorta
— surgical — a/w aortic rupture, tamponade, aortic regurg, AMI, stroke — more common (68%)
Type B
:
does not involve ascending aorta — medical (BP control and monitoring) — a/w limb/organ ischemia — less common, (32%) — usually originates just distal to L subclavian artery
Classic history: old person,
very hypertensive
;
abrupt onset
,
tearing/ripping chest pain
,
radiating to bac
k; a/w neuro symptoms e.g.
weakness/numbness
(due to vessel branch occlusion); a/w syncope/diaphoresis/N/V
Other risk factors include Marfan’s, connective tissue disease, FHx aortic disease, known aortic valve disease, recent aortic manipulation (e.g. TAVR, surgery), known thoracic aortic aneurysm, tobacco; rarely 3rd trimester pregnancy, TB, syphilis, vasculitis, blunt trauma
Classic physical: Pulse deficit (present in <20% of cases), unequal BP in upper/lower extremities, neuro deficits, signs of tamponade
Diagnosis:
Labs: basics, coags, trop, consider d-dimer (actually high sensitivity/NPV for dissection due to blood often clotting I false lumen)
CT angio aorta: gold standard for diagnosis of aortic dissection
CXR: not sensitive, not specific — sometimes mediastinal or aortic knob widening, few other nonspecific signs
TEE: is an excellent modality that’s in the works but we don’t have it operational yet
TTE: next best thing, as usual with ultrasound it’s specific but not sensitive - see below
Ultrasound for aortic dissection — obtain the following views:
Subxiphoid: look for pericardial effusion
Parasternal long: look for effusion, look at the descending aorta, look for aortic regurg with color doppler and measure the aortic root (nl <4cm) if you want to be fancy

Suprasternal window:
look for dissection flap (image from University of Maryland department of cardiology)
Probe above the the patient’s sternum pointed inferoposteriorly with probe marker to patient’s left (assuming cardiology convention)

Abdominal aorta scan: look for dissection flap from diaphragm to iliacs, also measure diameter in short and long
Management (From the AAC/AHA aortic dissection guidelines):
ACC AHA AoD Treatment-Algorithm
Note: When blood pressure is intact, first bring heart rate with beta blockers, then control pain, then see if they need further BP control.


