VOTW: I'd Tap That

Case 1: A 69 yoF with a PMHx of osteoarthritis presented to the ED with 1 day of worsening knee pain. The workup revealed a moderate-sized effusion and elevated CRP. These factors, combined with her discomfort, prompted the providers to perform an arthrocentesis.

Approach: While there are many approaches you can take to tap a knee effusion, the one I have seen most often is the suprapatellar approach (note: it is best to identify the area with the biggest pocket). Next, gather your equipment for a regular arthrocentesis plus a probe cover. Once you identify your pocket, turn your probe so it is in-plane with your needle. Advance your needle until you see it enter your fluid pocket and aspirate. Remember to put color flow over the expected trajectory of your needle to avoid vasculature.

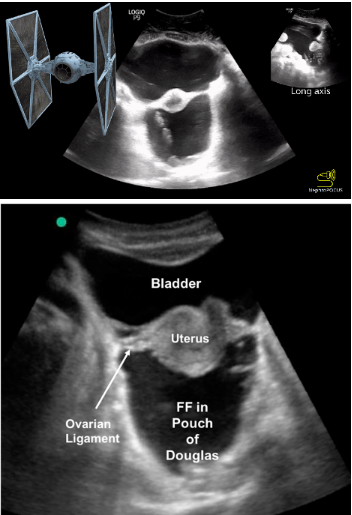
Image 1: Knee arthrocentesis set-up

  • Video 1 shows the moderate-sized effusion in the suprapatellar region. (note: you can also see a separate, rounded, fluid-filled area, which is the pre-patellar bursae).

  • Video 2 shows the needle in-plane during active aspiration.

  • Video 3 shows the needle in the decompressed joint space.

Case 2: A 102 yoF came to the ED with difficulty ambulating due to ankle pain. On exam, she had swelling, tenderness, and pain with passive/active range of motion. Bedside US showed a joint effusion and inflammatory markers were elevated. In conjunction with the family, the decision was made to tap the ankle joint.

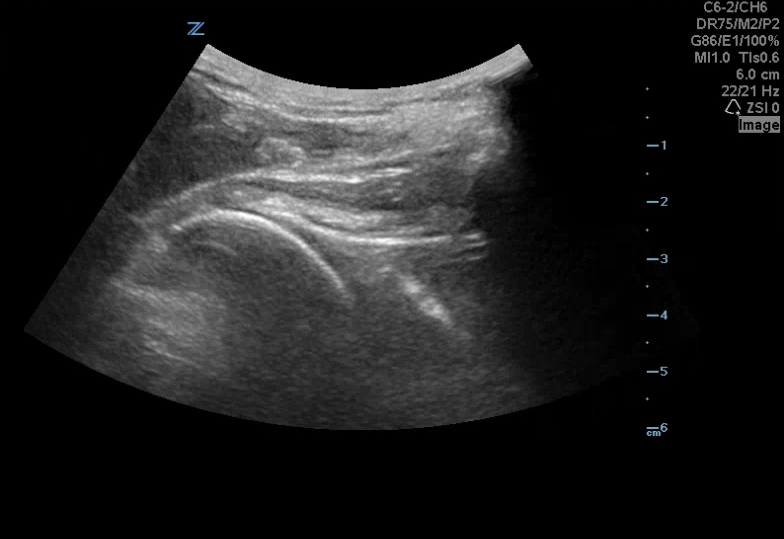
Image 2: normal tibiotalar joint space

Image 3: tibiotalar joint space with effusion

Video 4 shows a fluid collection at the tibiotalar joint. 

Video 5 shows Dr. Tran performing a dynamic aspiration of the ankle effusion.

Results: Results from the arthrocentesis in case 1 showed inflammatory arthritis and case 2 was gout. While neither case turned out to be septic arthritis, both patients felt much better after the tap and were able to ambulate. 

Why use ultrasound? Using ultrasound guidance to perform an arthrocentesis allows you to see the exact location of the joint effusion, improving your first-pass success rate. In addition, using color-doppler before the tap decreases the risk of neurovascular injury.

References:

https://coreultrasound.com/knee-aspiration-and-injection/

https://cdn.mdedge.com/files/s3fs-public/Document/June-2017/em049070329.PDF

https://www.tamingthesru.com/blog/mastering-minor-care/ankle-arthrocentesis

Happy scanning! 

Ariella Cohen M.D.


VOTW: In a pelvis, far far away

27 yoF presented to the ED with acute onset abdominal pain and distention. An ultrasound was performed that showed intraperitoneal fluid. Free fluid was identified at the liver tip and in the pouch of Douglas (video 1). 

As a reminder, the pouch of Douglas is the potential space between the uterus and rectum (seen in the suprapubic view).


Video 1 shows something called the “TIE fighter sign,” where large amounts of free fluid fill the pouch of Douglas, posterior to the uterus. The uterus and ovarian ligaments are suspended between the pouch of Douglas and the bladder. This sonographic sign is based on the fact that the appearance of the uterus and ovarian ligaments looks like the “Twin Ion Engine” fighter from the Star Wars movies (Image 1).

While the free fluid was initially presumed to be from a ruptured ovarian cyst, the patient remains admitted to workup this ascites of unknown etiology

Happy scanning!

Ariella Cohen

M.D.  Emergency Medicine 

Maimonides Medical Center 


VOTW: Throw what you know

This VOTW is brought to you by Drs. Chiu, Butt, Burns, Wong, and Sanghvi on a scan shift. 

A 42 yoM presented to the ED with a left shoulder dislocation. The ultrasound team looked at his dislocated shoulder (Image 1) and gave an Intraarticular lidocaine injection. The providers reduced his shoulder and then looked for confirmation using ultrasound (Image 2).


How can I do this?

Take your linear or curvilinear probe and place it in transverse orientation on the patient’s back next to the humerus (image 3). The glenoid should articulate directly with the humeral head (image 4). In an anterior shoulder dislocation, the humeral head will be deeper on your screen because it is further from the probe. In a posterior shoulder dislocation, the humeral head will appear more superficial because it is closer to your probe (image 5).

Why use ultrasound?

Ultrasound allows you to check in real-time whether or not the reduction was successful, rather than waiting for x-ray confirmation. I find this particularly useful for my workflow in cases where I am not 100% certain that the shoulder is back in.

References:

  • Martinoli, C. (2010). Musculoskeletal ultrasound: technical guidelines. Insights into imaging1(3), 99.

  • Jacobson, J. A. (2011). Shoulder US: anatomy, technique, and scanning pitfalls. Radiology260(1), 6-16.

  • 5 Minute Sono

  • The Pocus Atlas

Happy scanning!

Ariella Cohen, M.D.