Hello all! This week’s VOTW is brought to you by yours truly!
Hospital course
8 y/o M with PMH asthma presented after 5 days of URI-like symptoms with worsening shortness of breath yesterday. On exam the patient was tachycardic and had active subcostal retractions and crackles on auscultation. A bedside thoracic ultrasound was done.
Ultrasound
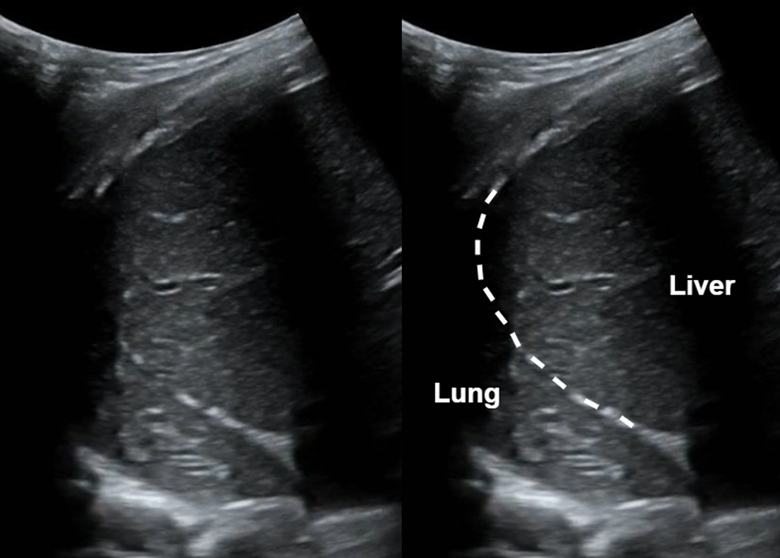
Shown above is the right hemidiaphragm or right upper quadrant view. We can see the liver and lung with the diaphragm (dotted line) in between. Note that the lung looks very similar in appearance to the liver! This liver-like appearance of the lung is called ‘hepatization’.

In the image above the lung contains small, dark linear structures that are called air bronchograms. They represent air-filled bronchi.
Case Conclusion
The patient continued to have respiratory distress and developed status asthmaticus requiring PPV. CXR showed bilateral atelectasis and possible underlying airspace disease concerning for pneumonia. The patient was admitted to the PICU on HFNC and given asthma treatments and IV antibiotics.
Lung hepatization & air bronchograms
· This patient had a combination of both lung atelectasis and pneumonia. Typically, lung tissue is not visible on ultrasound considering that it is normally filled with air. However, in the case of pneumonia, alveoli are filled with inflammatory fluid creating consolidations, while in the case of atelectasis the alveoli are collapsed rather than fluid filled. This pathologic lung tissue is now visible with ultrasound!
· Lung consolidations change the appearance of lung tissue on ultrasound such that its echogenicity looks remarkably liver-like, termed ‘hepatization’. This can also be seen in atelectasis.
· Air bronchograms visible on ultrasound represent air trapped within the small bronchi which are surrounded by lung tissue. Static air bronchograms are mostly seen in compression atelectasis but can also be seen in pneumonia; they are hyperechoic air-filled bronchi that do not move with respirations. Dynamic air bronchograms are pathognomonic for pneumonia; they represent air bubbles moving through fluid filled lung tissue. On ultrasound, dynamic air bronchograms look like numerous hyperechoic opacities that move with respirations.
Happy scanning!
Sono team
Resources to review:
· https://www.acep.org/sonoguide/basic/lung